

Remember in The Lion King, when Mufasa teaches Simba about the circle of life? (You know: The lions eat the antelope, eventually the lions die, the lions’ bodies decompose and turn into soil, the soil feeds the grass, and the antelopes eat the grass before being eaten by another lion?) Well, it’s not just a cartoon movie plot: The circle of life is a real thing—and it takes place via a process called composting. (Who knew Disney movies could teach us something so useful?)
Humans have been composting for thousands of years to improve the health of our soil, food, and planet. Now you (and your garden or lawn) can also reap the benefits of composting, thanks to this handy dandy guide to the circle of life.
What Is Compost and Why Should People Care?
Composting is basically nature’s own waste management process, in which nutrients are recycled back into an ecosystem. When organic materials (such as leaves, logs, fruits, and dead animals—basically, anything that was once living) are combined and left to sit for a while, they decompose into rich, fertile soil (aka “compost”). When we want to create compost with our own kitchen waste and lawn scraps, we can mimic natural composting on an accelerated time frame (more on how to do that below).
That’s cool and all, but why should we compost? First of all, it’s one of the most powerful tools we have for combatting food waste by keeping it out of landfills and waterways. Composting also enriches soil with nutrients, helps boost plant immunity, and reduces the need for chemical fertilizers in gardens and lawns, which can save money and spare the environment. As if that’s not enough, using compost can also encourage the presence of beneficial bacteria and fungi (which break down organic matter into soil) in the compost—when the compost is used in gardens and yards, these friendly decomposers (along with insects) make the soil healthier and may even improve the nutritional value of the food that grows in it.
Anyone can build a compost pile, whether it’s in the back yard or under the kitchen sink (yes, even in tiny apartments). And even if you don’t have a garden (or a yard), that compost can still be put to good use: Simply check with your local recycling coordinator to see if your community has a composting program that offers curbside pick-up. If not, call around to local farms (or a neighbor with an actual yard) and ask if they’d like your donated compost—chances are, they’ll say yes!
Everything You Need to Know About Composting at Home
What Goes Into Compost
All compost requires four primary ingredients: air, moisture, carbon (which we’ll refer to as “browns”), and nitrogen (which we’ll refer to as “greens”). Browns consist of plant-based materials such as dead leaves, branches, twigs, newspaper, and unbleached brown napkins. Greens consist of materials such as grass clippings, fruit and vegetable scraps, and coffee grounds. In general, you’ll want to add slightly more browns than greens. (If you run out of browns, ask neighbors to donate their extra leaves, twigs, or newspapers. If you live in a city, it’s easy to find browns—just raid the free newspaper dispensers!) For a full list of what to include in a compost (and what not to), check out this resource.
In order for decomposers (bacteria, fungi, and insects) to do their thing, compost also needs air and moisture (more on this later). Decomposition is an energy-intensive process, and aerobic bacteria produce heat as a side effect. Expect the compost to get very warm—even hotter than 100 degrees Fahrenheit in the center of a pile!
Establishing Your Own Compost
Outdoors
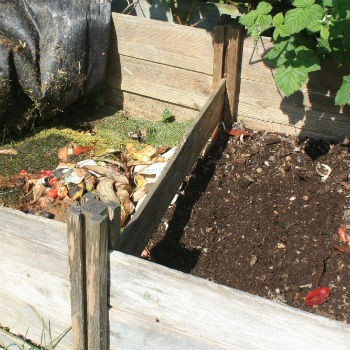
There are two ways to compost outside: In a pile (just like it sounds) or in a composting bin (basically a contained pile). If you’re only planning to compost leaves, grass clippings, and other non-food materials, then a pile should be just fine. The Environmental Protection Agency (EPA) recommends opting for a bin if you’re planning to compost food waste, too (in order to prevent rodents).
- Start by selecting a dry, shady spot near a water source (such as a spigot). Ideally, the area will be about three feet wide by three feet tall (though it’s possible to have larger or smaller piles). Try to keep the compost away from garden beds (in case it attracts pests, who might want to eat the foods in your garden!).
- If desired, give the pile some structure with chicken wire, snow fencing, or by nailing scrap wood together to make a box.
- Next, start adding browns and greens, in equal parts, as they’re collected (be sure to chop up larger sticks and shred big pieces of newspaper before adding them).
- If the first materials you add are dry, moisten them as you go by lightly spraying the compost with water until it's damp (but not soaked).
- Once things have started decomposing (you’ll be able to tell because they’ll start to change shape and color), mix in grass clippings, more greens, and fruit and vegetable scraps (try to bury the food scraps under other decomposing material).
- Every time you add materials to the pile (or at least once a week), “fluff” the pile by turning it with a pitchfork. This will promote aeration, which is essential to the decomposition process.
- Optionally, you can lay a tarp across the top of the compost to keep in moisture.
To compost in a bin:
The process for using a bin is virtually identical to composting in a pile, only it takes place in (you guessed it) a bin. Bins can be purchased from retail or mail-order businesses. They come in a variety of styles, so make sure to do your research to see which best suits your space and needs. Store-bought bins can be pretty expensive; luckily, it’s pretty easy to make your own bin or tumbler (a bin that can be easily turned with a handle).
Pro tip: If your compost pile or bin is outside, it’s useful to set up a little bin inside (on the kitchen counter or under the sink will work well). Add compostable kitchen scraps to this bin until it’s full, and then dump the contents in the bigger compost pile to save on trips outside.
Indoors
If you have the space in your house or apartment, it’s easy to build an indoor compost. If managed correctly, the bin shouldn’t attract pests or emit bad smells.
- Start by choosing two rubber or plastic garbage cans. The larger one should fit in the area of your home where you’d like to compost, and the smaller one should fit inside the larger one.
- Drill several (4-6) holes—each about half an inch in diameter—in the bottom and sides of the smaller can.
- Put a brick in the bottom of the larger can, and add a layer of wood chips, sawdust, or soil around the brick (it should reach the top of the brick but doesn’t need to go above it).
- Put the smaller can inside of the larger can, on top of the brick.
- Add browns and greens to the smaller can, following the same procedure described for outdoor composts, above (to help reduce odors, add more browns than greens, and bury food scraps in the existing compost). Make sure to fluff the compost on a weekly basis and check to make sure the materials remain moist (if things look pretty dry, sprinkle some water into the can).
- When you’re not adding scraps to the smaller can, keep a lid on top of the larger can (the smaller can does not need a lid).
Another option for indoor composting is vermicomposting, which uses a special kind of earthworm to produce compost in a small space (this method is particularly well-suited for classrooms, apartments, and tiny yards). Vermicomposting is typically done in a covered container with a layer of dirt, newspapers, or leaves. Feed fruit and vegetable scraps to the hungry little worms (known as “red wigglers,” these little guys eat their weight in organic matter every day), and watch the miracle of compost happen! For more on vermicomposting, check out this resource.
Using Your Compost
Compost is ready to use in gardens and lawns when the material is dark and rich in color and you can’t identify remnants of food or yard waste (If the compost looks mostly ready but there are still a few chunks of material, use a screen to sift out the chunks and add them back to the pile before using the garden-ready compost). Be patient: This can be a lengthy process, especially for outdoor composts, which are affected by a variety of factors (including weather, pests, compost composition, etc). Outdoor compost can take anywhere from two months to two years to be garden-ready, while indoor bins can produce viable compost in just two to five weeks. Once the compost is ready, apply it to lawns and gardens to give soil a hearty dose of nutrients. This will ensure that the soil stays healthy and is able to grow healthy crops for years to come.
For anyone new to composting, there’s bound to be a period of trial and error—don’t get discouraged! For help with troubleshooting issues (such as bad smells, slow decomposition, lack of heat in the pile, etc.), check out these guides from the Environmental Protection Agency and Composting 101. Happy composting!
Disclosure: All affiliate links on Greatist highlight products the team has either reviewed or thinks are kick ass. Greatist's editorial team is completely removed from the business side, which handles these fancy links.
Original article and pictures take http://greatist.com/health/compost-how-to-DIY-make-your-own site
Комментариев нет:
Отправить комментарий